
I am testing the stator on my 2007 Grizzly 400. I am testing the rotation direction coil and can`t get a reading. Red wire and white with blue stripe wire. Meter goes back to zero every time. I am on the 2k setting. Not sure but I think the spec ohms for that is .085 to .105. Maybe someone could verify that for me. If my reading is correct does that mean the stator is bad and what would the symptoms of that be if any? Thanks in advance.
Category Archives: Grizzly Tech Tips
Master Cylinder or Brake Reservoir Screw size ” Please help…
First and foremost. Thanks everyone for such a bad ass forum.
My question is I have a 2013 yamaha grizzly 550 and the screws on the master cyclinder stripped. Part number 98707-04012-00. Anyone know the size of this bolt or what a good replacement hex head would be? Thanks for anyone’s help. Trying to get ready for Mudd Jam and the damn screw stripped on me. Gotta replace it locally and want to make sure I have the right size.
Fixing an Engine Stop Switch for $0.30 (kill switch
Hello all,
I want to share with you how I repaired a faulty engine stop switch. The switch would not fully engage and sometimes would rattle and cut the motor. Please note that this is only what I did and I am not responsible for your outcome of following these instructions. In fact I encourage you to not follow these instructions at all and have all work performed by a Qualified Yamaha Service Center. If you do follow these steps it’s at your own risk.
What you’ll need:
- Phillips Head Screw Driver
- Small flat head screw driver (or something to pry with)
- "clicky" pen
- dikes
Steps:
- Remove the phiilps screws from the bottom of the handlebar switch (I believe there are 3 or 4)
- Pull the two halves apart gently and remove the screw inside holding the engine stop switch into the handlebar switch assembly
- Remove the stop switch assembly (it should have a rectangle box with a contact that the button attaches too and a "bullet" that protrudes into grooves on the casing
- Once you have the stop switch removed you’ll notice a metal contact on the back that has a spring under it. This spring gets weak and no longer holds the switch into the proper connected state.
- Remove the metal contact carefully, be patient and delicate so as not to break the plastic or the metal clips holding the contact in place. Use a small flat head screwdriver or similar device to separate this part.
- Now there is a spring with a bullet on the other end. Remove this spring and bullet, clean the cylinder that the bullet goes into and the bullet so it can slide smoothly in the cylinder. Remove the spring from the bullet as close to the bullet as possible if it hasn’t already fallen off
- Now take the pen from earlier and remove the spring from it, insert the spring into the cylinder. If the diameter is too big you’ll need a smaller pen.
- Now for some trial and error, you’ll need to cut the spring from the pen so that it isn’t too long, however leave enough that the bullet fully engages the grooves. The pen I used I ended up using about 1/2 the spring and I have a really "stiff" switch now. I ended up with a spring about 2.5 times the depth of the cylinder with the bullet installed.
- Insert the bullet and new spring into the cylinder (discard the old spring) and compress the new spring with the back contact and hold everything together.
- Insert this assembly into your handlebar switch, you’ll have to move the contact and bullet in to get it into place. Just go easy and you’ll figure it out.
- Before putting the screw back in, hold it firmly in place with your thumb and test that the switch is able to be toggled easily and fully engages. To test that it is engaging remove your seat and turn the key on. As you move the switch you can hear the relay under the seat engaging and disengaging. Make sure that once it’s engaged, that wiggling the switch does not disengage it again.
- If it doesn’t engage properly, the spring is too short. If the switch is too hard to move, the spring is too long.
- Put everything back together.
If anyone is interested in what I did and these instructions are confusing, I am more than happy to take mine back apart and snap pictures of the process.
Won’t crank
Ok so this past Sunday I was making a ride and I was leading the group since everyone was scared to lead. Well I decided to take what I thought was a go around on the trail because the trail looked rough. As I was on the go around making my way back to the main trail. I hit a hole. I managed to stop my grizzly from going all the way in by bailing over the front rack into the hole and catching the front of it. Well it still started to sol and end up about at an 80 degree lean towards the right front. Well it ran like that for aapproximately 45 seconds then died. Was able to crank it after that but died before being able to get it in gear and out the hole. So now here I am I’ve gone as far as I can on my own. I’ve checked for water in my oil, air intake, and spark plug. I’ve checked my lean sensor and it seems to still be working. The engine is turning over nothing appears to sound locked up. Its just not firing up. Any input is very much appreciated. I’m just trying to avoid bringing it to the shop.
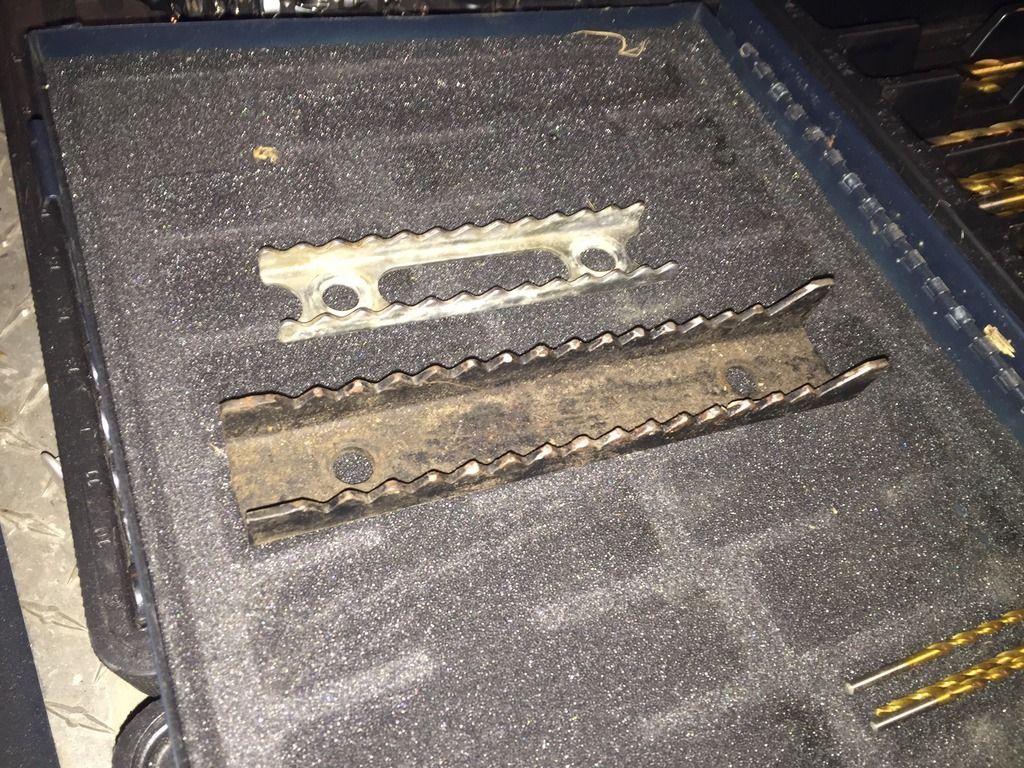
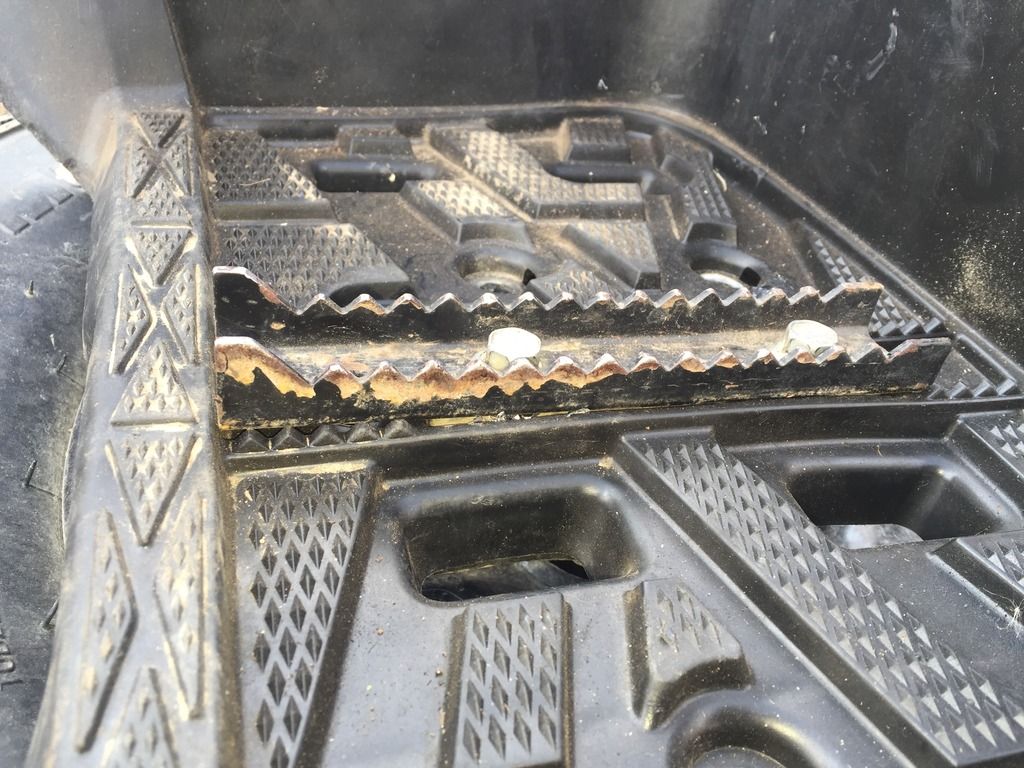
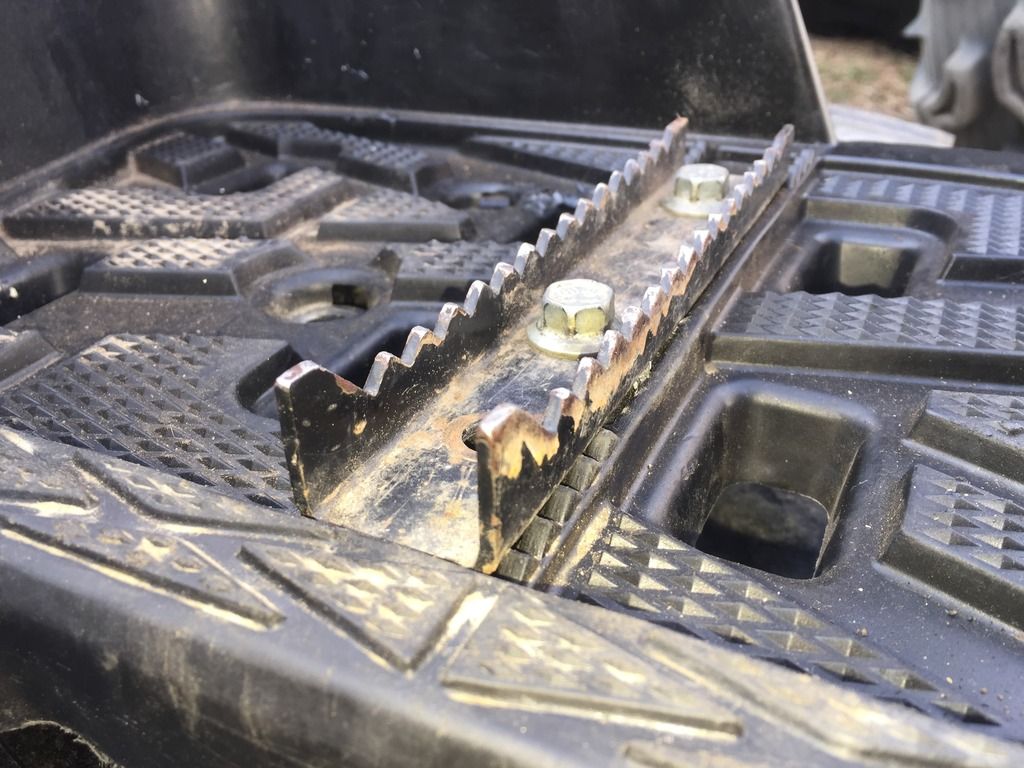
Cheap oversive footpegs you can buy for $13
So I was going to make my own set of footpegs after seeing the ones on my buddies XMR. Unfortunatley CanAm wants big money for those. The GYTR pegs are also great but I am cheap and they are they same height all the way across. I had some 1-1/4 HSS tubing that I was going to slice and dice to bolt on my 700. Then I remembered I still had a bunch of Arctic Cat parts in my barn. Physically the AC pegs are about twice as big as the factory yamahas. They also have a lip about 3/8" tall on the outside edge to keep your foot in (something you don’t get with the GYTR pegs). They don’t quite slip into the slot in the foot rest but they do nest nicely in between the two sides. You will have to drill one hole in each peg to match your footboard holes, the outside hole already matches perfectly. I put 3 washers inside between the peg and the plastic to keep it from crushing. I did have to use longer screws. I had 30mm flange head M10 screws on hand and they worked perfect. In the end they stick up above the footboards about 5/8". You won’t want to use these pegs if you like to ride in running shoes or flip-flops. But if you ride in a lot of mud or snow and like to stand up most of the time these are a great upgrade.
Suspension or Something trouble?
Hey,
Hopefully someone has some idea of whats causing this. I have a 08 kodiak 450 (grizzly, I live in canada) and i noticed when i was looking at the bike in the garage today the front end is lower on one side than the other, about 3/4"-1" difference in height (measuring from the floor to the front rack). My tires aren’t low, the preload adjustments are the same on both shocks and I cant find anything bent. Any ideas where to check?
Sunk my 4 wheeler in mud now it has water in the engine and smoking
I sunk my 2014 grizzly 450 in a deep mud hole.It now has water in the oil and today its smoking pretty bad.Any ideas on what I can do before I send it in to a repair shop.Thanks